Tuesday, August 13, 2013

DIY Wreath

<a href="//www.pinterest.com/pin/create/button/?url=http%3A%2F%2Fwww.flickr.com%2Fphotos%2Fkentbrew%2F6851755809%2F&media=http%3A%2F%2Ffarm8.staticflickr.com%2F7027%2F6851755809_df5b2051c9_z.jpg&description=Next%20stop%3A%20Pinterest" data-pin-do="buttonPin" data-pin-config="above" data-pin-height="28"><img src="//assets.pinterest.com/images/pidgets/pinit_fg_en_rect_gray_28.png" /></a>


I have a love for color and my second love in decorating is texture.  Put both of those together and "boom!", watch out world!  The inside of my house is a plethora of bright colors combined with fun textures.  Mostly you'll find a lot of texture on my furniture surfaces I've refinished, because I love the raw exposed flaws in woods and paints.  You might also see a lot of texture in my paintings, because again, I love the feeling and look of a beautiful orange, aqua or red over a textured subject.  So lately I've been trying to incorporate more texture to my decor that are plants, twigs & florals.  I decided to make a wreath and I thought I'd share just how easy it is to do it:

 What you'll need: 

           -2 bouquets of floral of your choice, or 10 larger sized stems 
         -14" grapevine wreath


First, cut each flower off of the stem leaving a few inches of length. 


Next, push each flower through the grape wreath, through the vines positioning each flower where you'd like them to go.  *Don't use the hot glue gun just yet, make sure you have them positioned the way you want it first!


I positioned my flowers fairly close to each other, almost overlapping the other because I wanted a fuller effect.   


Once you've got all of the flowers pushed through and positioned where you want them, go ahead and start gluing the flowers to the wreath.  I glued the back of the flower at the base, just above the stem and pressed on each flower about 8-10 seconds to make sure it was secure.  If it still feels loose, pull up the ends of the petals and glue the backs down where they won't be seen.  

Once you've got them all secure, I trimmed the stems on the back that were sticking out.  I also glued 4 small felt pads to 4 corners of the wreath to help with scratching the back of the door.  


That's it!  You're done!  I'm so happy with the way it turned out.  I think I'll make more now...


Thursday, February 28, 2013

Timm & Sam

Okay so it's been forever since I've done a photo shoot & I had the best time snapping pics of these two lovebirds!!  It was a windy & cold day at Red Rock National Park, but that didn't bother Timm & Sam!  Here are a few of my favorites:


Sunday, January 6, 2013

"C-5" - Vintage Grey

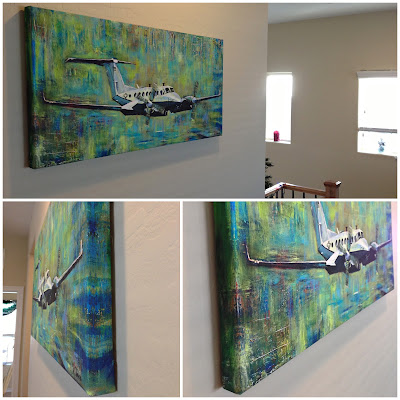
I love it when my customers send me photos of their painting hung on their wall!  Thank you for the photo and thank you for your service, LtCol Turner!!!  I wish I had your house!


in this photo is a watercolor paper print of my "C-5", colors: vintage grey, size: 24" x 48"

Wednesday, November 21, 2012

"MC-12"

My latest aviation art is this commissioned "MC-12" I just finished. I really have been enjoying painting these awesome aircrafts! The original size is 20"x 40" shown in the bright green below.  Hand-painted acrylic on canvas.  Available for purchase.. check out my etsy shop or   tifsheppard.com for ordering information.  Lots of different sizes and color options soon to be available...


Colors available: 
Vintage White

Vintage Grey

Bright Green

Black & White


Rustic Red Christmas


My "Rustic Red Truck" Print was highlighted here on Etsy:  Check it out! 


G-5 over DC

Here is my latest commissioned piece, a G-5 Gulfstream flying over Washington DC's National Mall.  Original painting is 30"x40", acrylic on canvas.


Available in 3 different color options shown below:  

See: tifsheppard.com for ordering information


Friday, October 12, 2012

Jedi


"Jedi" 22"x28" acrylic on canvas, ceramic stucco
My sister-in-law recently asked me to do a painting of her 12 year old happy-go-lucky dog named "Jedi".  Knowing that it's easier for me to connect to the subject I'm painting with a more personal connection, Marcia told me story after story of Jedi.  After finding out his love for running through the timber and chasing deer, rabbits and geese, I knew I had to paint him in just that setting.  The fall colors really inspired me.  Living in Las Vegas right now, I can only imagine what the rest of this country (where there's much more luscious trees) is like.  So to help my frame of reference, I turned on my awesome white noise app "Relax M.P." on my iphone and listened to the sounds of rain, campfires and birds chirping in the wilderness.  I guess that's what you gotta do to pretend you're not in the desert, when in actuality it's still getting up to the 90's here!  What gives?!  Good thing I can escape to the wonderful world of painting to help my sanity when it comes to beating the heat.  All in all I'm so happy with the way this painting turned out.  It came so easy to me, and I owe that to the beauty of Jedi and his amazing spirit.  Thanks for giving me the opportunity to do this, Marcia :)


Wednesday, August 15, 2012

My Barn Board Decor

This is what I decorate with to remind me of Iowa & my parent's tree farm :)


Beautifully Cracked & Chipped- Re-finishing Furniture- My Newest Obsession!

My new found love for re-finishing furniture has become a new passion of mine.  I love giving an old piece of furniture new life & finding it's functionality again.  On the other hand my house is getting full of painted furniture, and it's almost starting to look like a store in some rooms!  Well, it's not that bad, but you get my point :)  Below are a few projects I've done.  The first is this console / bookshelf that seriously just seemed sad.  I had just gotten done with my "Murmuration" mural with a black skeleton tree on it and thought how sweet it would be to paint a tree up the side of this console table.  Here are my before and afters... check it out:)


After:  I used Annie Sloan Chalk Paint- Barcelona Orange & Graphite (mixed with white & a bit of country blue to soften it up)... finished with both Chalk Paint's clear wax and dark wax.


dresser: before

dresser: after


New Aircraft Paintings Complete!

Well I think it's about time I post some new blog entries!  It's something I always seem to forget, and my goal is to post my work more frequently on here.  Below are images of my most recent aircraft paintings in several different color variations available for print purchase.  The first picture is an MQ-9 Reaper... I love how the colors turned out:


Shown below is my "MQ-1 Predator" shown in all my color options: